


Are you looking to create a Gmail account or wondering how to log in to your existing one? In this article, we will guide you through the process of Gmail account creation and login. Gmail, a popular email service provided by Google, offers a wide range of features and benefits to its users. By following a few simple steps, you can have your own Gmail account up and running in no time. So, let’s get started!
How to Sign Up a Gmail Account
If you don’t have a Gmail account yet, follow these step-by-step instructions to create one:
Step 1: Go to the Gmail Account Creation Page
To start the account creation process, open a web browser and visit https://accounts.google.com/signup
Step 2: Fill Out the Required Information
On the account creation page, you’ll see a form asking for your personal information. Fill in your first and last name, desired email address, and choose a strong password. It’s important to select a unique and secure password to protect your account from unauthorized access.
Step 3: Choose a Username and Password
Your username will become your email address, so choose a username that is professional, memorable, and reflects your identity. If your preferred username is unavailable, Gmail will suggest available alternatives. Once you’ve chosen a username, create a strong password that includes a combination of letters, numbers, and symbols.
Add Recovery Options
Gmail provides the option to add recovery information to help you regain access to your account if you ever forget your password. You can provide a recovery email address and a phone number for account verification and password reset purposes. Adding these options enhances the security of your account and ensures you can recover it easily if needed.
Agree to the Terms of Service and Privacy Policy
Before proceeding, it’s essential to read and understand the terms of service and privacy policy of Gmail. Take your time to review them, and once you’re comfortable, click on the checkbox to indicate your agreement.
Complete the Setup Process
After agreeing to the terms, you’ll be directed to the Gmail setup process. Here, you can customize your account settings, such as profile picture, theme, and display preferences. You can skip this step for now and modify these settings later.
Congratulations! You have successfully created your Gmail account. Now, let’s move on to the next section and learn how to log in to your account.
How to Login to Your Gmail Account
Logging in to your Gmail account is a straightforward process. Just follow these steps:
Step 1: Go to the Gmail Login Page
Open your web browser and visit the Gmail login page. You can simply search for “Gmail login” on any search engine, and the official Gmail login page will appear in the results.
Step 2: Enter Your Email Address
On the login page, you’ll see a field to enter your email address. Type in the email address associated with your Gmail account.
Step 3: Enter Your Password
In the next field, enter your password. Make sure to enter it correctly and be mindful of uppercase and lowercase letters.
Step 4: Click on the “Sign In” Button
Once you’ve entered your email address and password, click on the “Sign In” button to log in to your Gmail account. If the credentials are correct, you’ll be redirected to your Gmail inbox.
Troubleshooting Login Issues
Encountering login issues can be frustrating, but there are solutions available. Here are some common login problems and their troubleshooting steps:
Forgot Your Password?
If you forgot your password, don’t worry. On the Gmail login page, click on the “Forgot password?” link. Gmail will guide you through a password recovery process, which typically involves verifying your identity through a recovery email or phone number.
Account Recovery Options
If you previously set up recovery options, such as a recovery email address or phone number, Gmail provides the option to recover your account using those methods. Follow the prompts and provide the necessary information to regain access to
your account.
Two-Step Verification
To enhance the security of your Gmail account, consider enabling two-step verification. This adds an extra layer of protection by requiring a verification code in addition to your password during the login process. You can set up two-step verification in the security settings of your Gmail account.
By following these troubleshooting steps, you can overcome common login issues and regain access to your Gmail account swiftly.
How to find out when i signed up for gmail
1. Find the Welcome Email
When you first create your Gmail account, friendly old Google sends you a welcome email. The exact contents of that email have changed since the service began in beta in 2004.
To find the welcome email, go to the All Mail folder (to see it, you may need to click More to expand the folders.) In the top right, hover over the pagination and click Oldest.
This will put the email you first received at the top. However, if you imported non-Gmail emails into your inbox from before 2004, the welcome email won’t be at the top. It also won’t be there if you haven’t kept all your emails.
An alternative method to find the email is to search for “welcome”, “Gmail team”, “gmail-noreply@google.com”, or “googlecommunityteam-noreply@google.com”.
As a slice of history, here’s what that first welcome email opened with:
First off, welcome. And thanks for agreeing to help us test Gmail. By now you probably know the key ways in which Gmail differs from traditional webmail services. Searching instead of filing. A free gigabyte of storage. Messages displayed in context as conversations.
If you no longer have the welcome email, check your sent items—you might have sent someone an email on the day you created your Gmail account.
2. Check Your POP Settings
This is an unexpected one, but your POP settings might show the date you created your Gmail account.
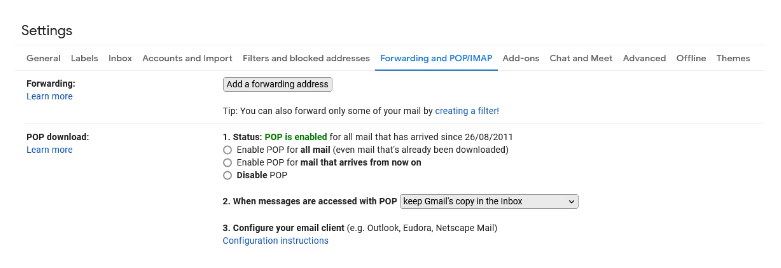
To access this, click the cog icon in the top right, select See all settings, then click Forwarding and POP/IMAP.
Within the POP download section, look on the Status line. If you’re lucky, you’ll see the following:
1. Status: POP is enabled for all mail that has arrived since [DATE]
However, if you have ever changed your POP settings, the date you made your Gmail account won’t be shown. It also won’t be shown if you’re using an organizational account that may have preconfigured the setting.
3. Try Google Takeout
Google Takeout is a service you can use to export your Google data into various formats. Back when Google+ was a thing, you could export that data to discover when your Gmail account was made. However, that’s no longer possible.
That said, if you don’t need an exact account creation date and are happy with a rough idea, Google Takeout might still prove useful—though it will require some manual searching.
You can export all of your Google data, from services like Chrome, Drive, and YouTube, and then find the earliest timestamp of activity. Again, this won’t necessarily give you the exact date, but it can help to give a ballpark.
4. Query the Google Drive API
Google provides a Drive API that developers can use to interact with Google Drive. You can query this API to find out when your Google Drive account was created. It’s likely that this is the same date as when your Gmail was created; it’s not a certainty, though, so don’t take it as gospel.
First, visit the Drive API using this link. This prepopulates the necessary fields for the query. Click Execute, then choose the Google account you wish to find the creation date for. Click Allow to authorize Google APIs Explorer to access your account.
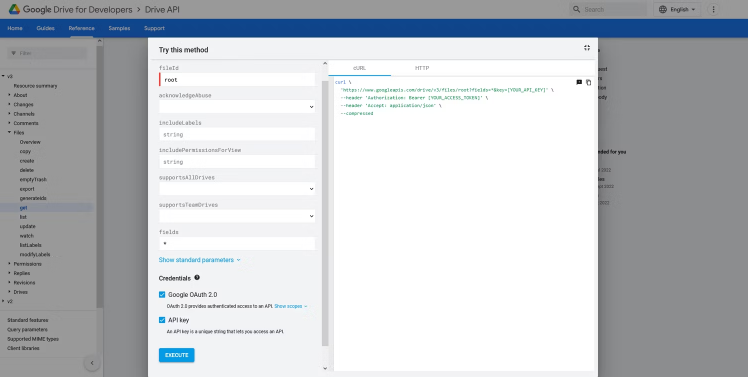
Back on the Drive API page, the bottom-right of the window should populate with the API query. Within the application/json tab, find createdTime. This gives your Drive account creation date in year/month/date format.
To remove Google APIs Explorer from your account once you’re done, go to your Google Account and navigate to Security > Manage third-party access > Google APIs Explorer > Remove access > OK.
How to sign up for gmail without phone number
To signup for gmail account without phone number
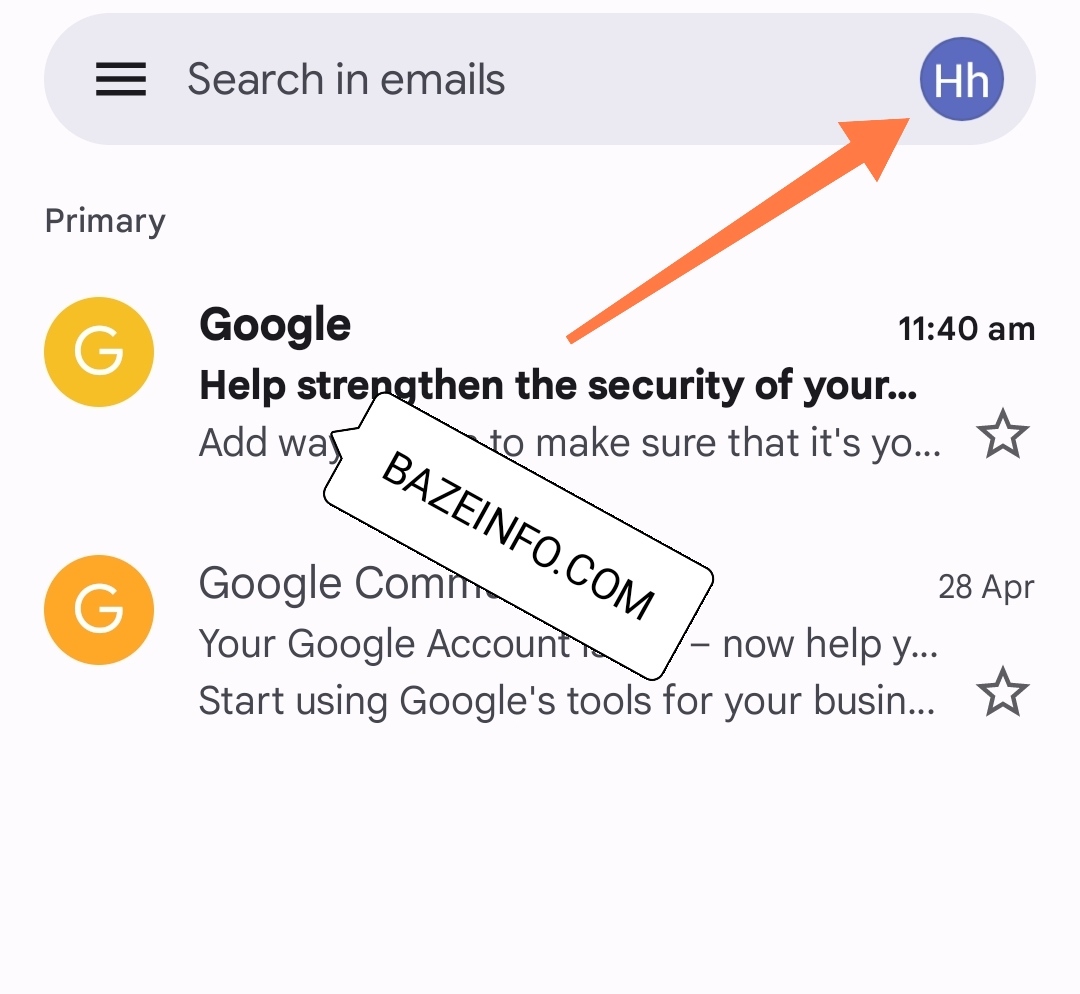
- Open the Gmail app on your smartphone, make sure the Gmail app is updated to the latest version

Gmail App - Click on your profile picture at the top right of your screen and then click on Add another account
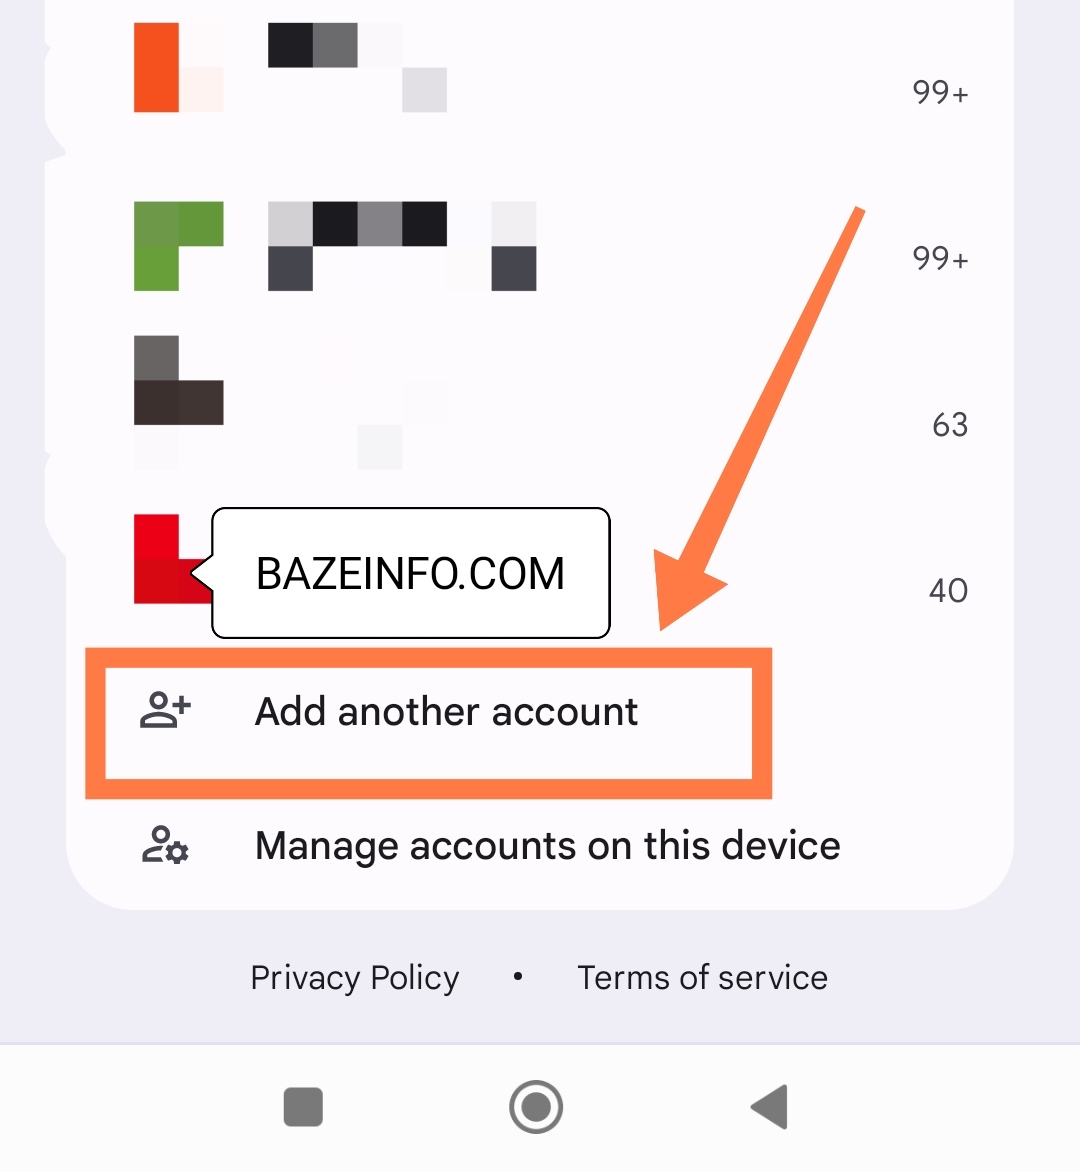
- Click on add another account from the drop-down menu list displayed on your smartphone
- On the next screen that appears on your smartphone, select Google as displayed in the below screenshot
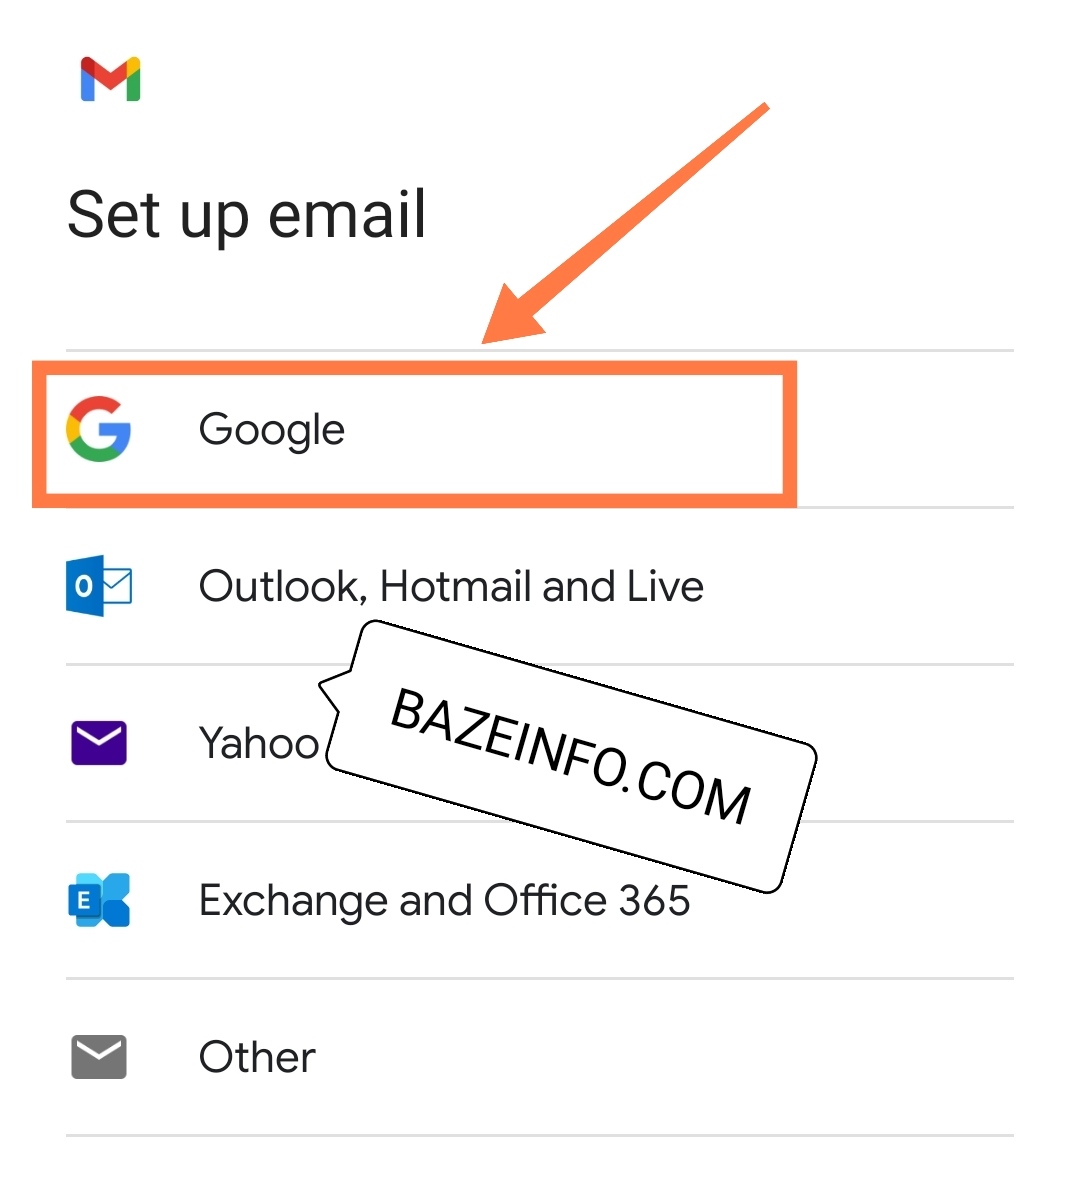
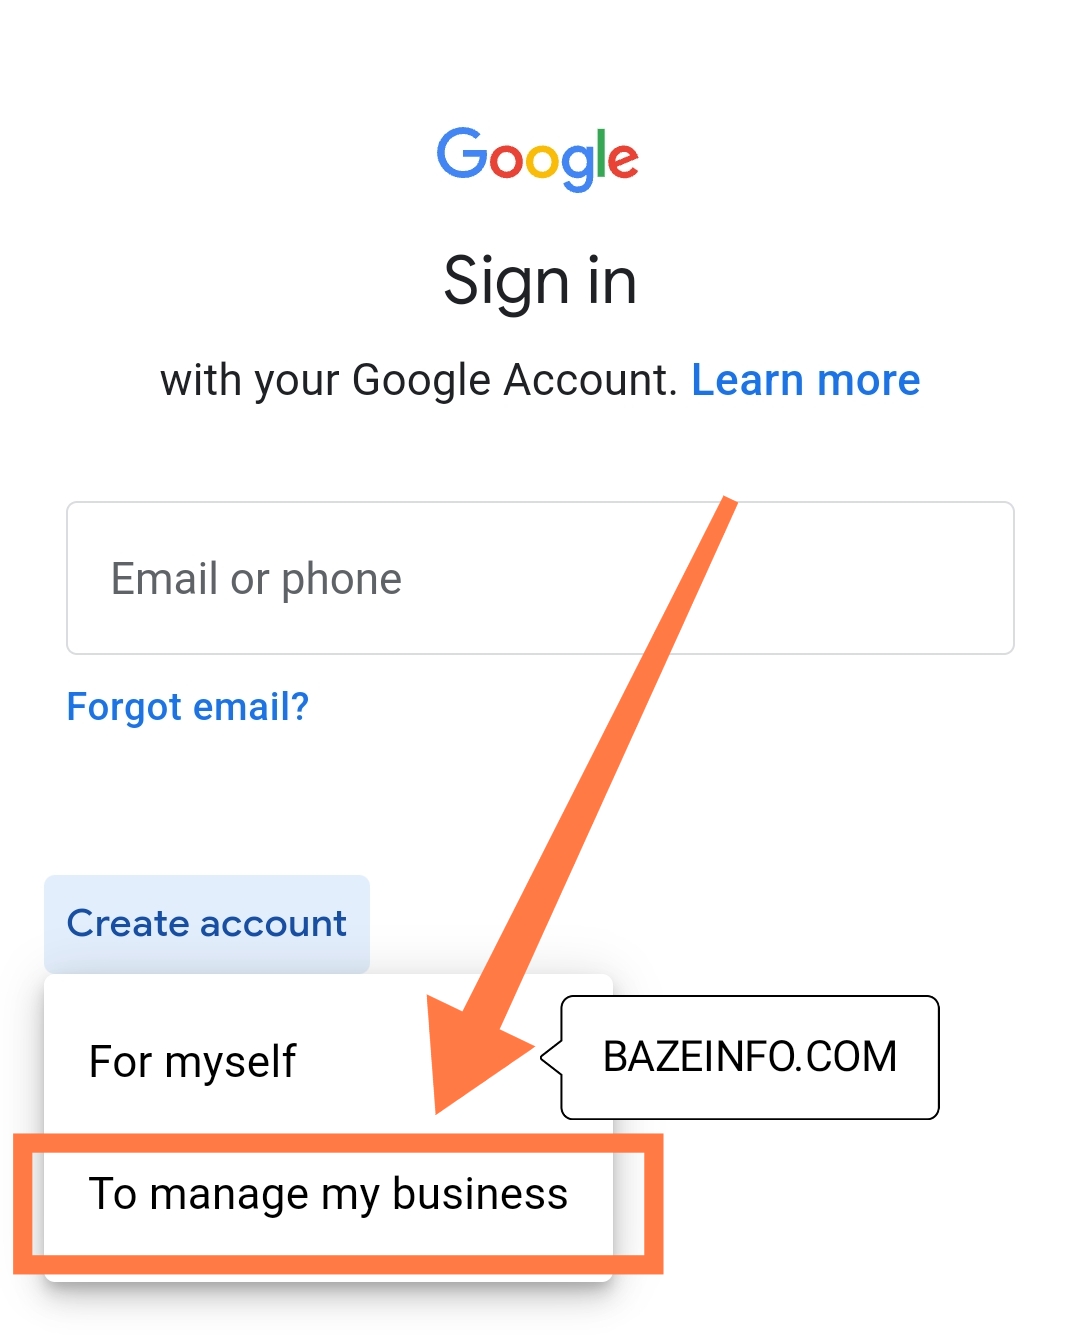
- After selecting google, the Gmail/Google login page will appear, click on create an account and then select To manage my business as displayed on the image below
Gmail For Business - After clicking to manage my business as seen above, the next page that will appear is the Gmail registration page, fill in the boxes with the information you want to use to sign up for the gmail without phone number and google will not ask you to input your phone number neither will google ask you to verify your phone number, once you are done with the registration it will redirect you to your inbox where you can now see your messages. And that is how to register a Gmail account without phone number in any country.
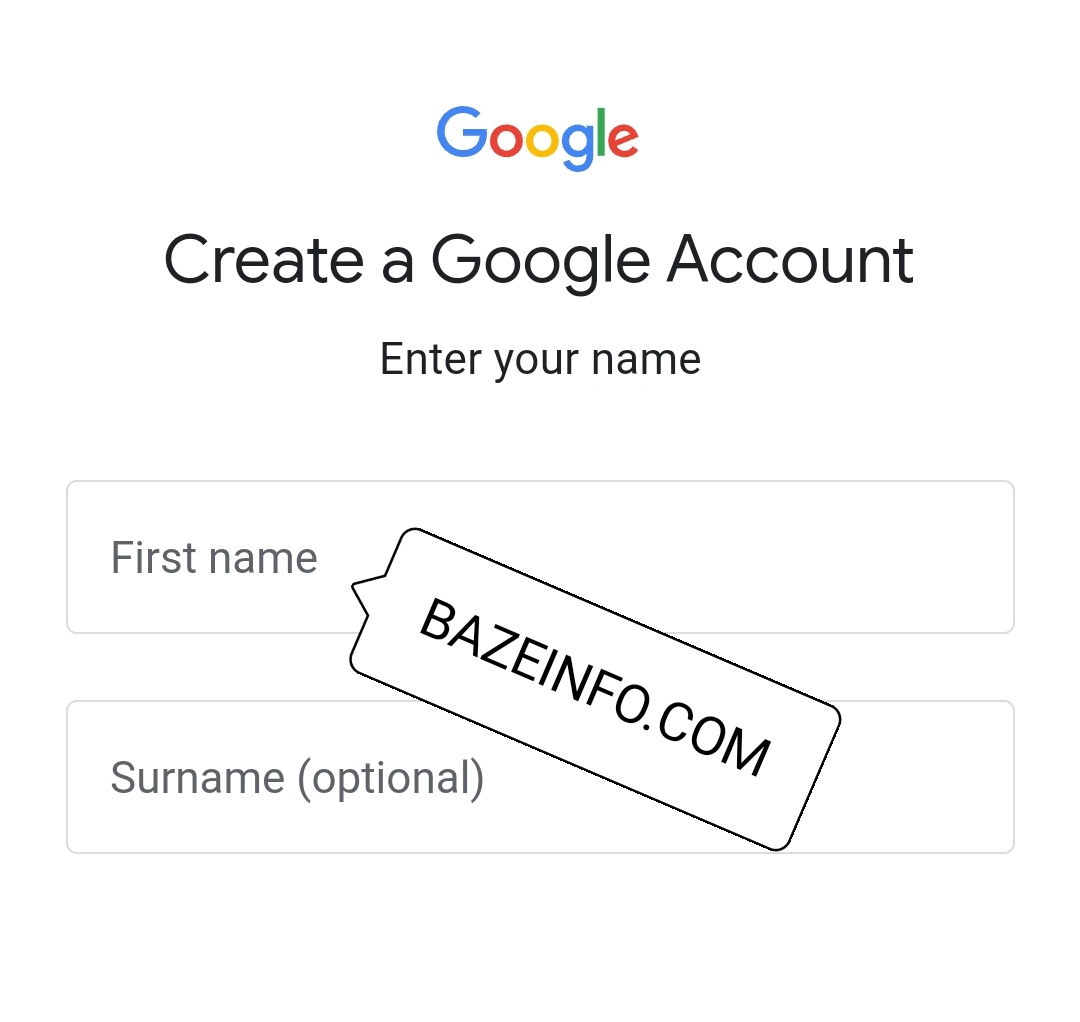
Gmail sign up page
Frequently Asked Questions (FAQs)
Q1. Can I create multiple Gmail accounts?
Yes, you can create multiple Gmail accounts using different email addresses.
Q2. Is Gmail free to use?
Yes, Gmail is a free email service provided by Google.
Q3. Can I access my Gmail account on my mobile device?
Absolutely! You can access your Gmail account on smartphones and tablets by downloading the Gmail app or accessing it through a web browser.
Q4. What should I do if I suspect unauthorized activity on my Gmail account?
If you suspect unauthorized activity on your Gmail account, immediately change your password and review your account security settings. Consider enabling two-step verification for added security.
Q5. Can I use my Gmail account for business purposes?
Yes, many individuals and businesses use Gmail for professional communication. Gmail offers features like customized email addresses and seamless integration with other Google services, making it suitable for business use.


